Thứ Sáu, 17 tháng 7, 2015

Rule of Thirds - Darren Rowse

The Rule of Thirds
The Rule of Thirds is perhaps the most well known principle of photographic composition.
The “Rule of Thirds” one of the first things that budding digital photographers learn about in classes on photography and rightly so as it is the basis for well balanced and interesting shots.
I will say right up front however that rules are meant to be broken and ignoring this one doesn’t mean your images are necessarily unbalanced or uninteresting. However a wise person once told me that if you intend to break a rule you should always learn it first to make sure your breaking of it is all the more effective!

What is the Rule of Thirds?

The basic principle behind the rule of thirds is to imagine breaking an image down into thirds (both horizontally and vertically) so that you have 9 parts. As follows.
What is the Rule of Thirds

21 Settings, Techniques and Rules All New Camera Owners Should Know - Darren Rowse

Some are very basic while others go a little deeper – but all have been selected from our archives specifically for beginners and new camera owners. Enjoy.

Introductions to Useful Modes and Settings on Your Digital Camera

Photography Settings, Techniques and Rules
1. Digital Camera Modes Explained – I spoke with a family friend recently who had just bought a new point and shoot camera. She came up to me with her camera when no one was watching and embarrassedly asked me if I could tell her what all the little icons on the dial on top of her camera meant. This article explains what each of these most common digital camera modes means and does. Knowing them can take your shots to the next level.
2. Aperture and Shutter Priority Mode – this introduction talks you through these two very useful settings that can be found on many digital cameras. Aperture and Shutter Priority modes take you out of Automatic mode giving you more control over your images – but don’t thrust you fully into manual mode – they are great settings to explore and master.
3. Introduction to White Balance – one of the most common problems that I see in beginner photographer images are shots with incorrect color. We’ve all seen them – portraits where your subjects teeth and eyeballs (and everything else) has a yellowish tinge. Learn what causes this and how to combat it with this tutorial on White Balance.

Digital Camera Modes - Darren Rowse

http://digital-photography-school.com/digital-camera-modes/

Darren Rowse is the editor and founder of Digital Photography School andSnapnDeals. He lives in Melbourne Australia and is also the editor of theProBlogger Blog Tips. Follow him on Instagram, on Twitter at @digitalPS or on Google+.

This week I did an informal survey on a few of my digital camera owning friends and asked them to nominate which shooting modes that they most commonly use on their digital cameras (they use a range of point and shoot and DSLR digicams).
The results of this little survey didn’t really surprise me – Automatic Mode was the overwhelming response from both beginner and the more advanced users alike (a little surprising to me). In fact three of the people I questioned responded by asking ‘is there any other non Automatic mode?’
As a result I’ve decided to take a run through the basic shooting modes that most digital cameras have (both point and shoot and DSLRs have most of these).
While this is pretty basic information for many readers I hope it will be helpful for those right at the beginning of their digital photography journey who are yet to venture out of Automatic Mode.
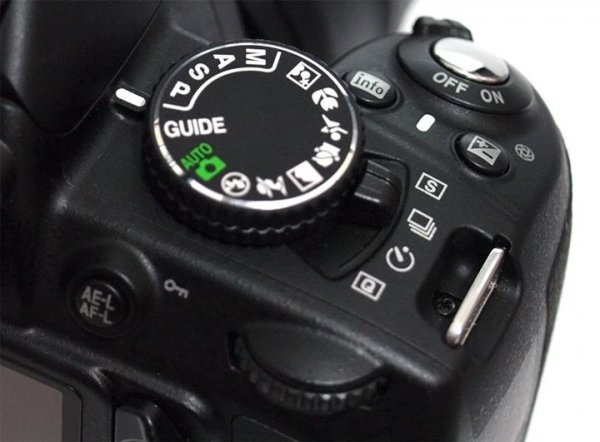
Automatic Modes

Automatic Mode

I suspect no one will need any introduction to this mode (as it seems most digital camera owners use it). Auto mode tells your camera to use it’s best judgement to select shutter speed, aperture, ISO, white balance, focus and flash to take the best shot that it can. With some cameras auto mode lets you override flash or change it to red eye reduction. This mode will give you nice results in many shooting conditions, however you need to keep in mind that you’re not telling your camera any extra information about the type of shot you’re taking so it will be ‘guessing’ as to what you want. As a result some of the following modes might be more appropriate to select as they give your camera a few more hints (without you needing to do anything more).
Portrait Mode
Portrait-Mode-1
When you switch to portrait mode your camera will automatically select a large aperture (small number) which helps to keep your background out of focus (ie it sets a narrow depth of field – ensuring your subject is the only thing in focus and is therefore the centre of attention in the shot). Portrait mode works best when you’re photographing a single subject so get in close enough to your subject (either by zooming in or walking closer) so that your photographing the head and shoulders of them). Also if you’re shooting into the sun you might want to trigger your flash to add a little light onto their face.